Adventure: The Territory of Kerrindale

Introduction for Players - The Territory of Kerrindale
For first time players, please read the Campaign Overview on this site's home page. Then, read the Introduction to the Ministry of Heroes.
The History of Kerrindale:
Separated by sea from the mainland kingdom and bordering unknown lands filled with numerous monsters, for two generations the Royal Family has tried to tame the Island of Kerrindale with settlements and military outposts. Despite all of the difficulties and danger, the land teams with life and is one of the most profitable territories the kingdom owns.
The Royal Family made two separate settlement migrations near the end of Fulskatar the Great's reign. The first resulted in the establishment of Garrenfold, the main economic center, and also two small fortifications at strategic locations for protection. The effort was so successful in a very short time, with regular ship loads of food, wood and precious stone coming into the mainland, that King Fulskatar decided to make a gamble. The majority of the army was sent by ship to make an all-out invasion of the territory. In a few short weeks they successfully purged the entire main valley leading up to the western mountain range of all monsters.
Then three major fortifications, at great financial cost, were established (thanks to the help of Dwarves). But the risk paid off - for a whole generation afterward, settlers built farm houses up and down the valley and filled the mainland kingdom with abundant natural resources.
Year: 3020, according to the Calendar of the Elves:
Recently, the young King Holgar son of Fulskatar and his queen Ava the Beautiful are faced with a great struggle. In response to the tragic events at Castle Ravenloft in Barovia that caused the death of Princess Lo'reean and her husband Count Strahd, a major war with Da'rahad has broke out on the mainland along the eastern border of the kingdom. Most of the soldiers who were protecting Kerrindale have been reassigned. The inner military outposts have been abandoned while others on the boundary were left occupied by an insufficient, small number of soldiers. Unfortunately, the monsters who dwell west of the mountains must have realized that the border was no longer well-protected, and concentrated efforts from various groups are now threatening the stability of the area.
Soon after the Royal Guard were reassigned, the warning signal from Garrenfold was seen in Olingrol. The next morning, a wave of sea vessels arrived filled with men, women and children evacuating the Kerrindale area, bringing reports of well organized movements of monsters over-running the outer fortresses and burning all the homes in the valley next to the Western Wall. And worst of all, a Red Dragon has made its home in the largest of the outposts (the Mountain Pass Fortress). One of the king's seers has received a vision in her dream revealing that the dragon plans to leave its lair and make raids on the town, breathing fire from the sky, to drive out the remaining settlers once and for all.
While the King and Prince Bomar, Commander of the Royal Guard, begin the process of pulling Royal Gaurds away from the eastern front to return to the island, a group of Heroes have been tasked with the mission to go to Kerrindale and purge as many monsters as they can. Restore peaceful order for the remaining people who live there, and success will be richly rewarded with treasure, land and title.
Twelve Heroes in all make their way to Kerrindale, each bearing the King's Seal. As Heroes arrive in Garrenfold, they are escorted to the Military Post in the center of town to meet with the local Captain of the Royal Guard. From there, a decision is made to divide the Heroes into four separate groups. The first three groups will follow different paths and work their way through the region:
The first group will follow a path to the Southern Fortress to deal with the Orc Menace there.
The second group will travel through the heart of Kerrindale to the Mountain Pass Fortress and slay the Red Dragon.
The third group must travel north and then into the Dark Forest, because the road through the Dark Swamp is now blocked by Giant Worms. From there they will make for Wizard's Glade and then onto the Northern Fortress to uncover the Undead Mystery there.
The forth group will stay behind in the town of Garrenfold, to protect it from the Dragon if it manages to make raids from the sky, and to help defend against any monster forces that make it to the town...
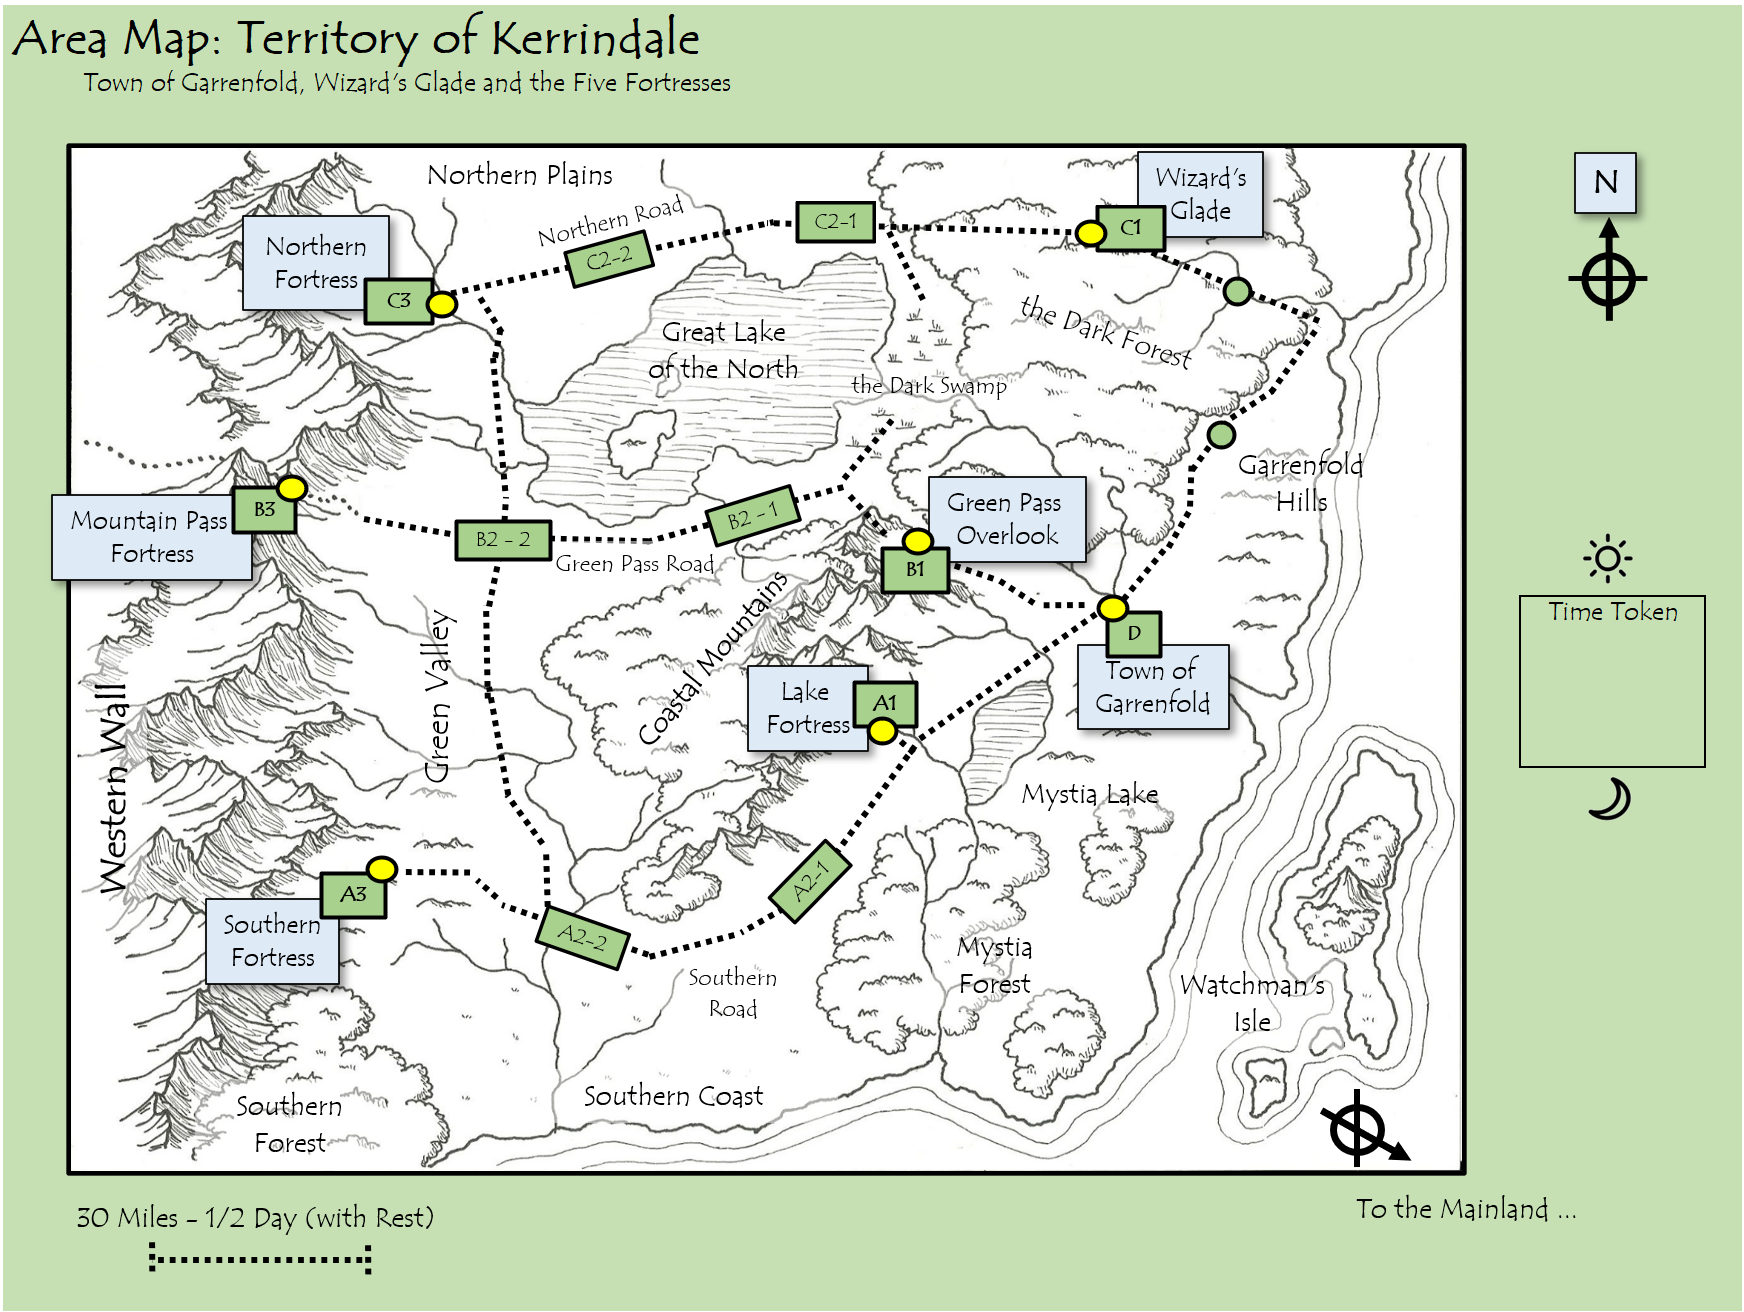
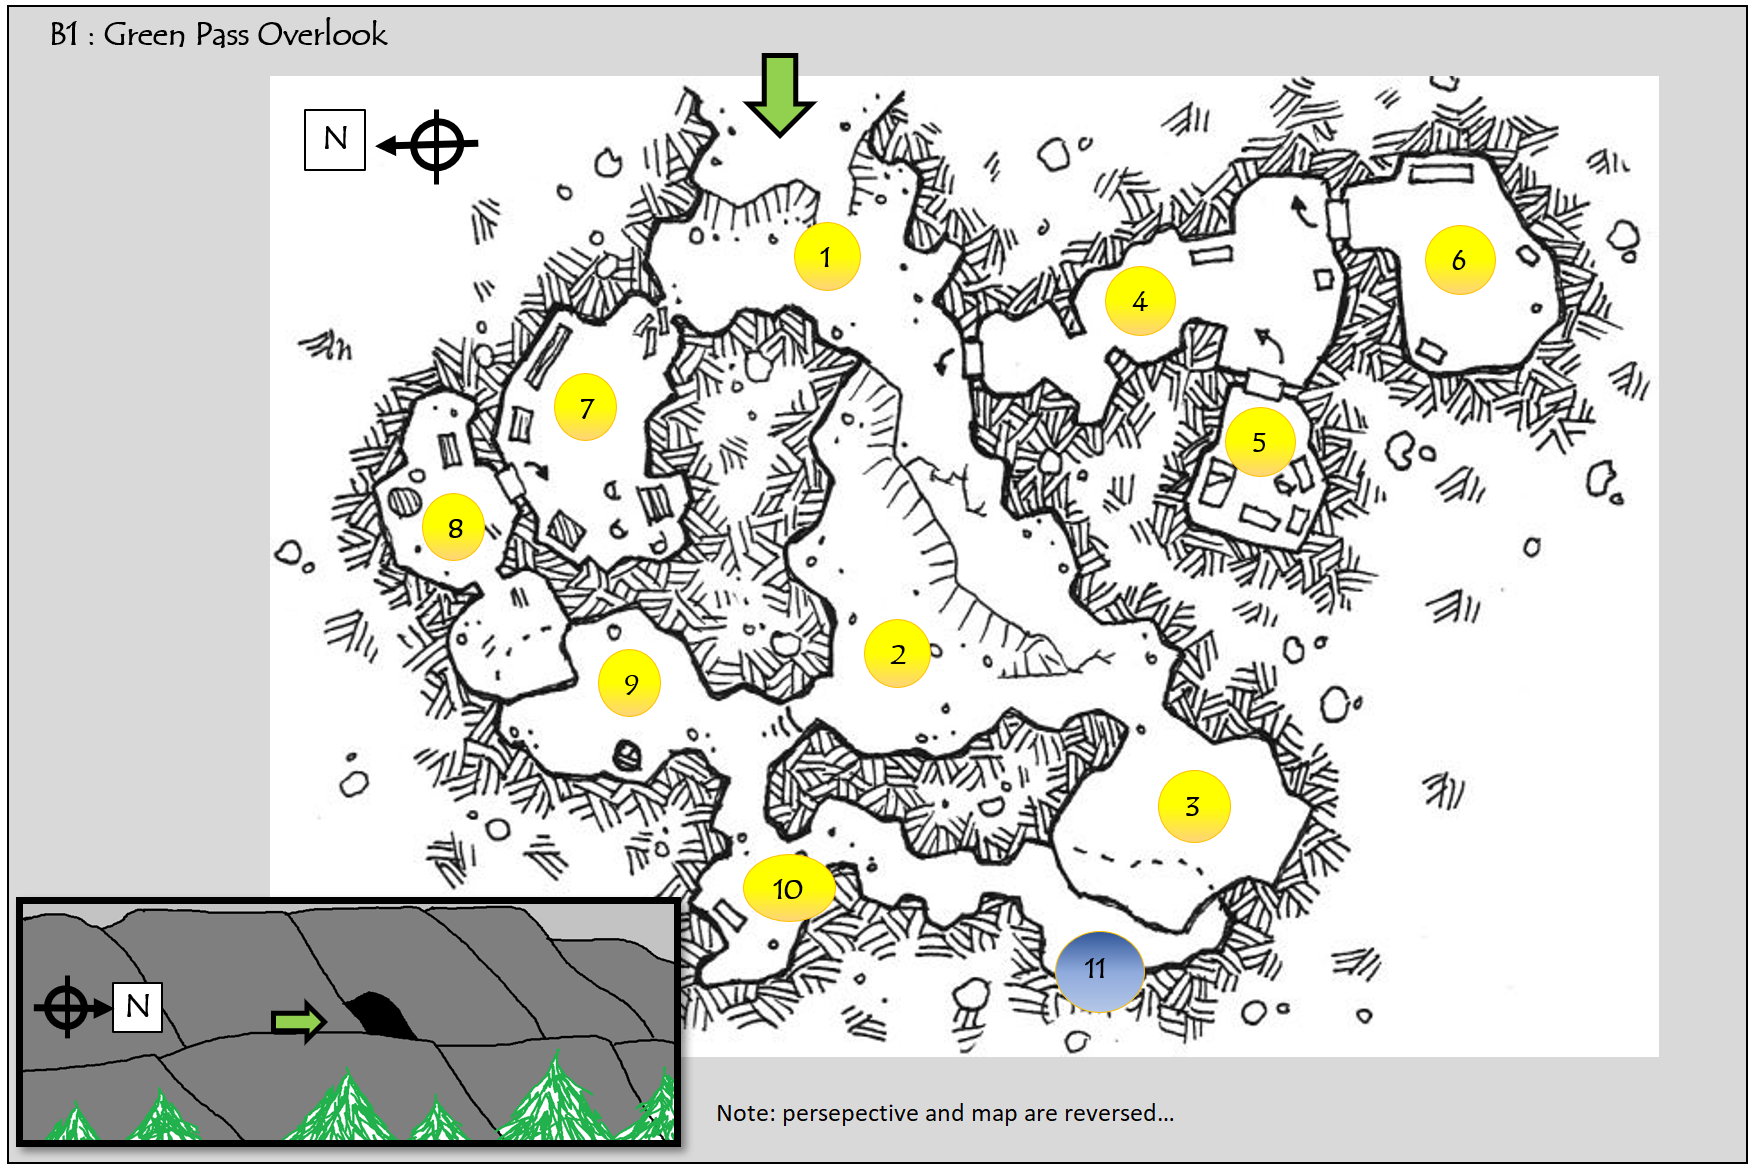
Area Map:
Click on the map to open a higher resolution version in another window...


Related Links:
Adventure Summary for GM
Warning: the information presented below is a spoiler alert for Players...
Details below for each Episode are provided at a summary level only. The number of minion monsters and the strength of the boss monster/s are not specified - the assumption here is the GM will flesh out those details based on the game engine being used, the experience of the players and the character levels.
Parallel Adventures:
According to the Story Line, there are four Adventures that happen at the same time (with a day or two of each other), when a large group of Heroes gather in Garrenfold and are split into separate groups, each following a different path into the Territory of Kerrindale or staying behind to protect the town. These groups are made up of three Heroes each - but the GM is free to adjust this to fit your game group.
Summons / NPC:
In order to help the Heroes on the difficult missions they are embarking on, the Royal Court of magicians has offered various Summons capabilities to call for help if they are overwhelmed by enemies. Each group of Heroes can choose from the following:


An Eagle Summons Ring will call a Giant Eagle to assist the Heroes who wears it. The Hero can communicate with the Eagle when it arrives.


There are two different Crystal Summons available for the Heroes. One to call a Raven Swarm, the other a Centaur Warrior.
Adventure One - The Orc Menace
From the Captain of the Guard to the Heroes:
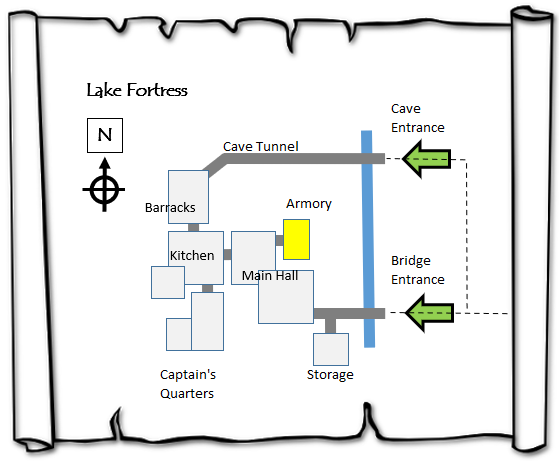
Your group of Heroes have been selected to follow the Southern Road, first to Lake Fortress, and then on to the Southern Fortress. You must purge all monsters from both fortresses.
The Lake Fortress was built after Green Pass Overlook during the first settlement period. Because of recent orders to consolidate all remaining soldiers back to the town of Garrenfold, it has been abandoned. Since then, scouts have reported seeing a number of creatures making the fortress their home, including an infestation of Giant Spiders.
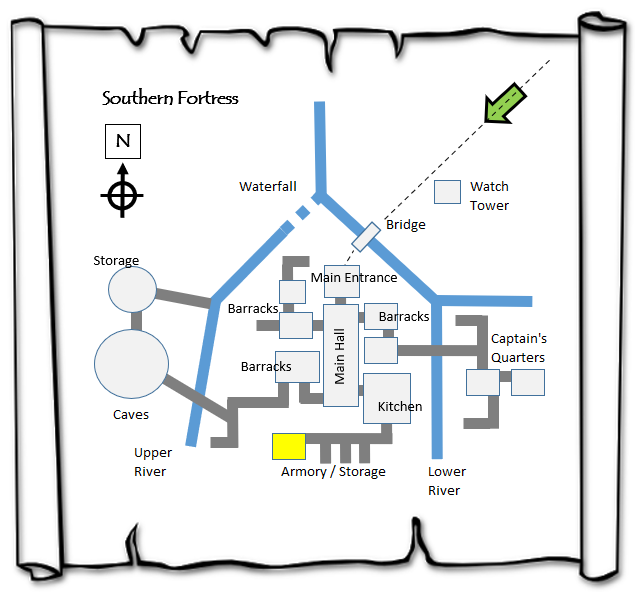
The Southern Fortress, built during the second settlement period, was the Royal Guard's favorite location, having the most impressive architecture features and a refreshing water fall. Soon after the Northern Fortress fell, this location was over-run by Orcs who invaded using some secret pass through the southern forest. Since then, scouts report that the Orcs have converted the beautiful outpost into a shattered ruin.
Armory Locations and Magic Gates:
Under orders from the Royal Family, for a number of years the Royal Court of Magicians have been forging and hiding magic items in every Garrison Armory across the kingdom, including the Fortresses at Kerrindale. Maps are provided to the Heroes that show the logical layout of each fortress with the location of each Armory, and a Bag of Gems are provided that can be used to unlock any Magic Gates that are in place to protect the Armories:
Click on each map to open a higher resolution:
Overview:
In Episode A1 (Lake Fortress), Heroes must work their way through the Lake Fortress which is overrun by Giant Spiders and Beetles, a Bat Swarm and a Rat Swarm. There they will find the first cache of weapons and magic items.
In Episode A2 (The Southern Road), Heroes may be attacked on the road by a gang of Thugs or a pack of Owl Bears, depending on the time of day. They will also come across an Orc Patrol.
In the final Episode A3 (The Southern Fortress), Heroes must make it past a Guard Tower with Orc Soldiers and Archers, then into the Fortress which is overrun by Orcs. The Armory with additional magic items is being protected by a pack of Hell Hounds, and there is a large cave with a big, smelly Ogre.
Monsters:
Dungeon Maps:
Click on each fortress map to open a higher resolution version in another window...

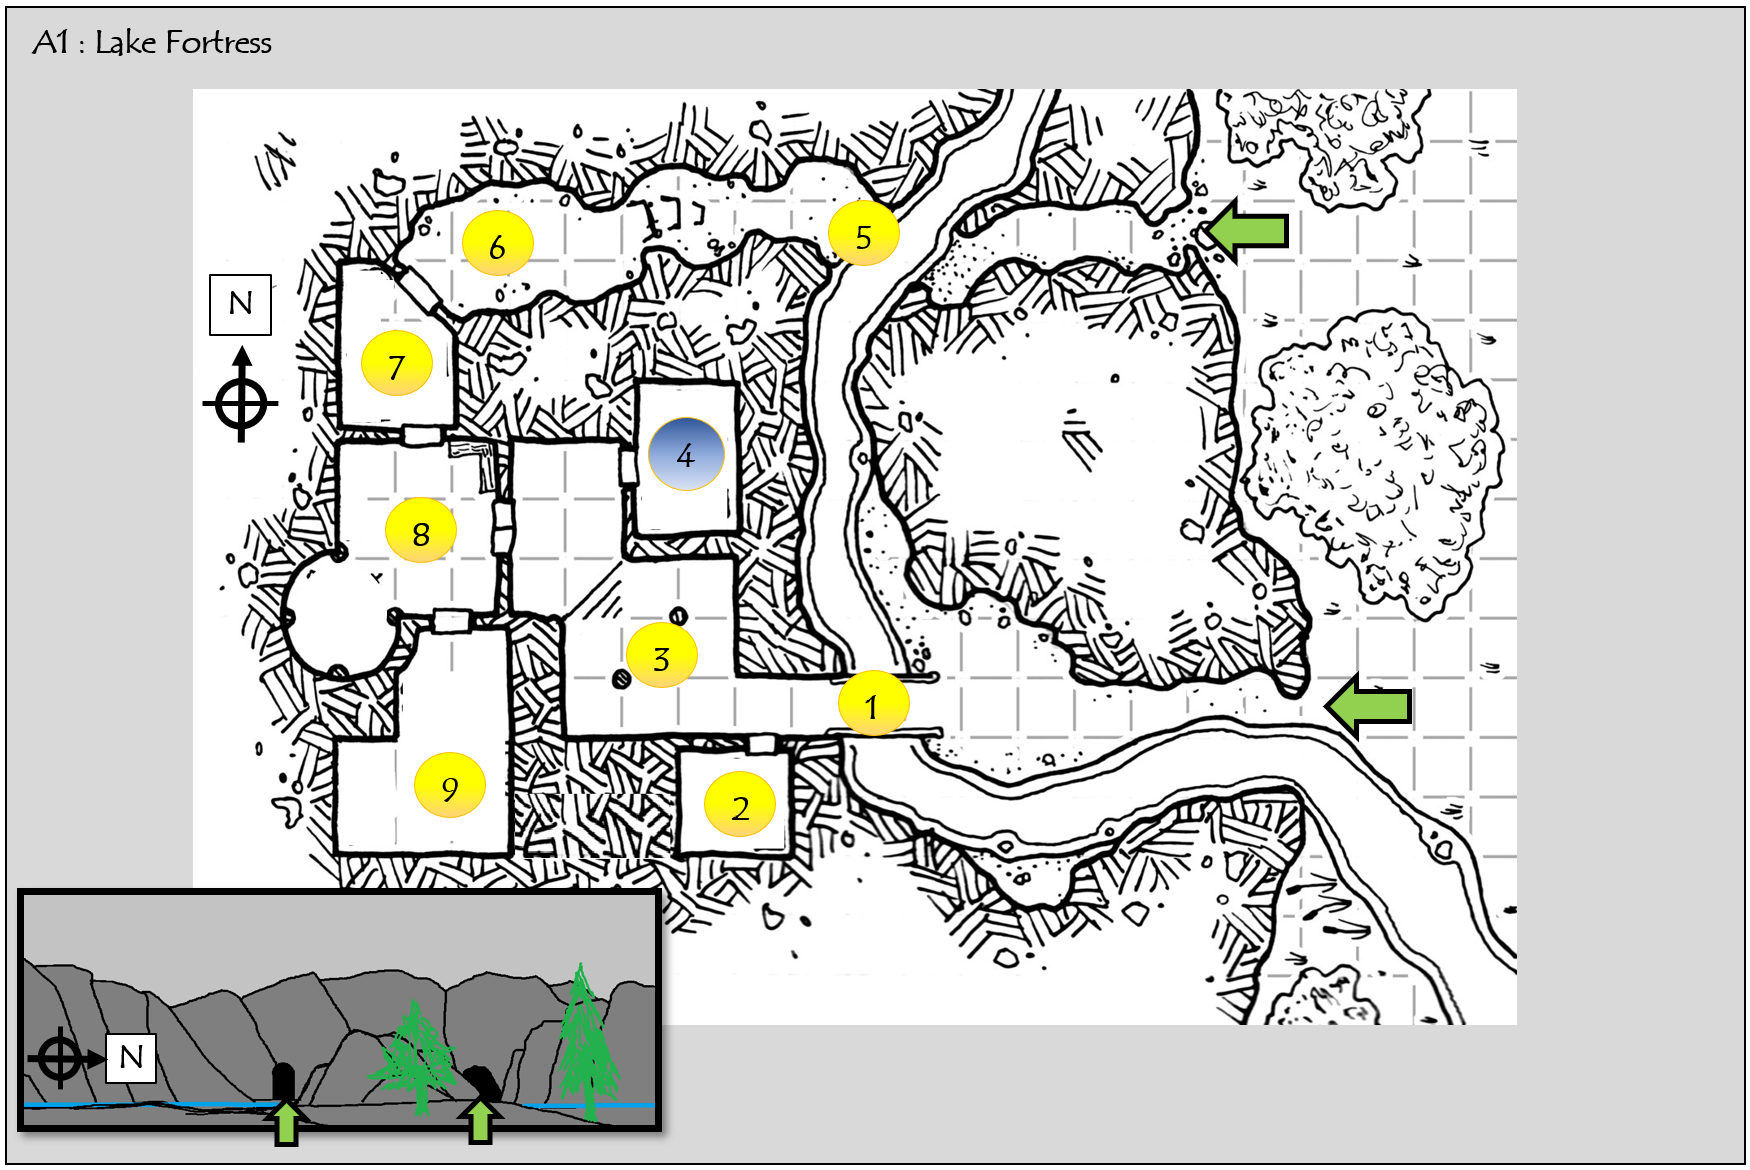
1) Poison Spore Trap; 2) Rat Swarm; 3) Giant Spiders; 4) Armory (no monsters); 5) Falling Rock hazard; 6) Bat Swarm; 7) Giant bettles; 8) Giant Spiders; 9) Main Giant Spider Infestation...

A2-1) Night: Human Thugs + Thug Leader + Trained Hyenas; Day: Pack of Owlbears.
A2-2) Orc Patrol = Orc Captain + Orc Fighters.
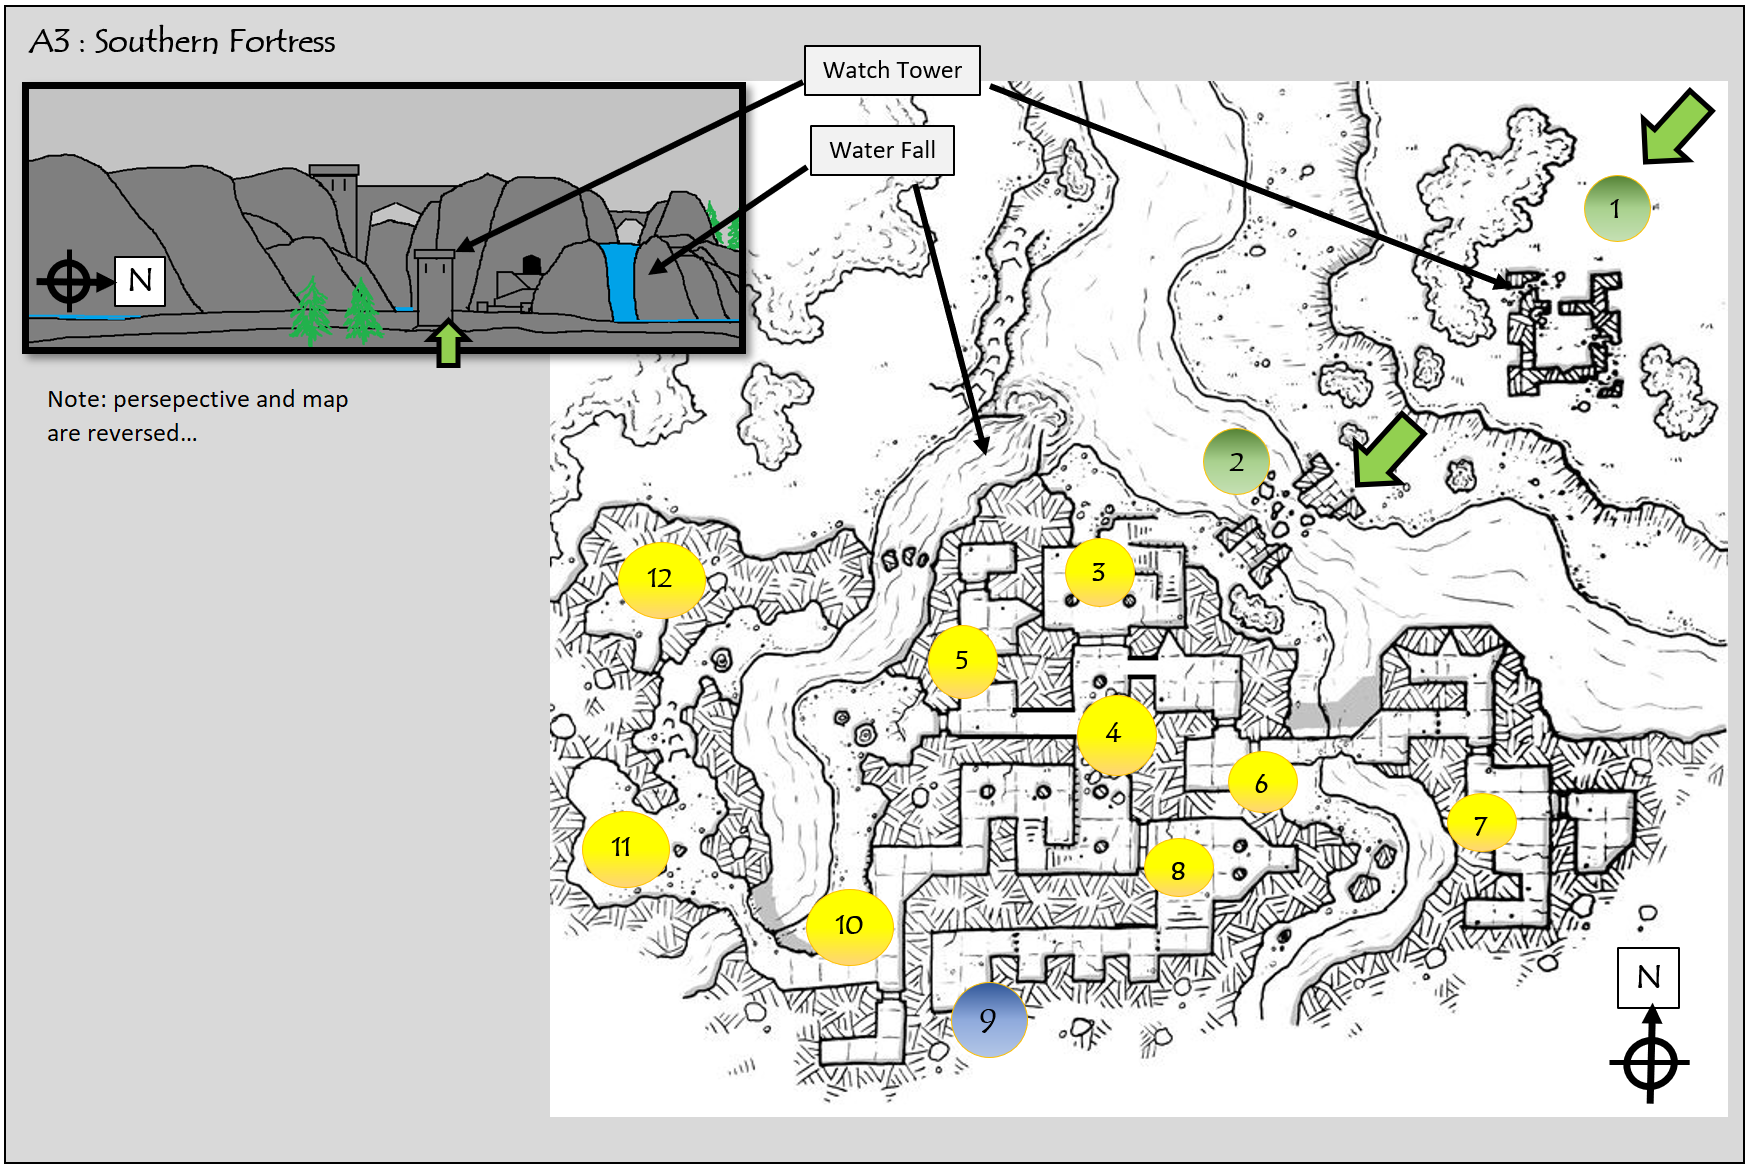
1) Orc Archers + Orc Fighters; 2) Broken Bridge hazard; 3) Arrow Trap; 4) Orc Captain + Orc Fighters; 5) Orc Captain + Orc Archers + Orc Fighters; 6) Trolls; 7) Orc Captain + Orc Archers + Orc Fighters; 8) Trolls; 9) Armory with Magic Items, sealed by a Magic Gate and guarded by Hell Hounds; 10) Arrow Trap; 11) Orc Fighters + a big, smelly Ogre; 12) Orc Captain + Orc Archers + Orc Fighters (will come to help Ogre).
Magic Gate:
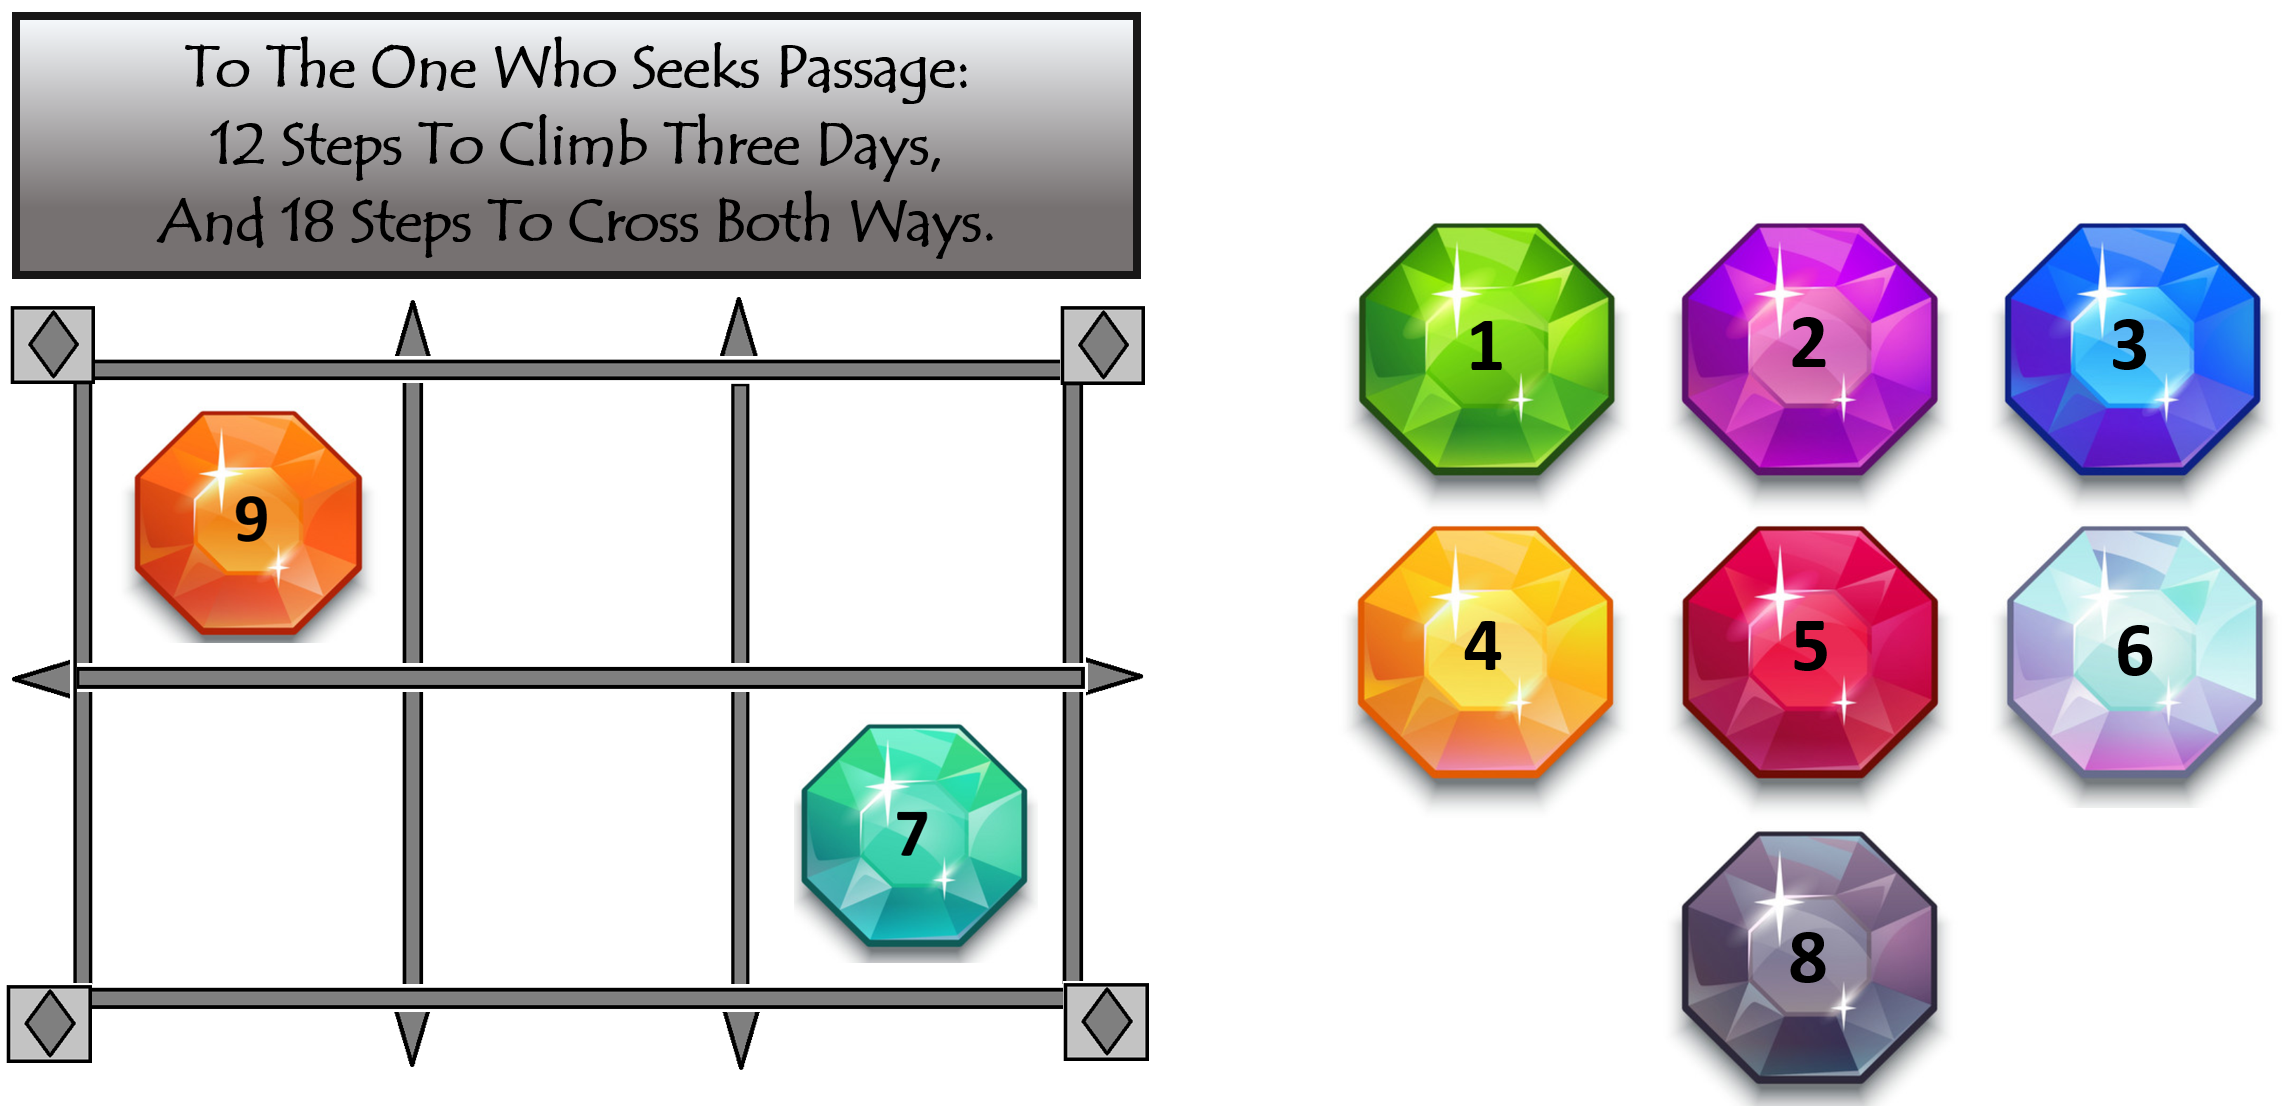
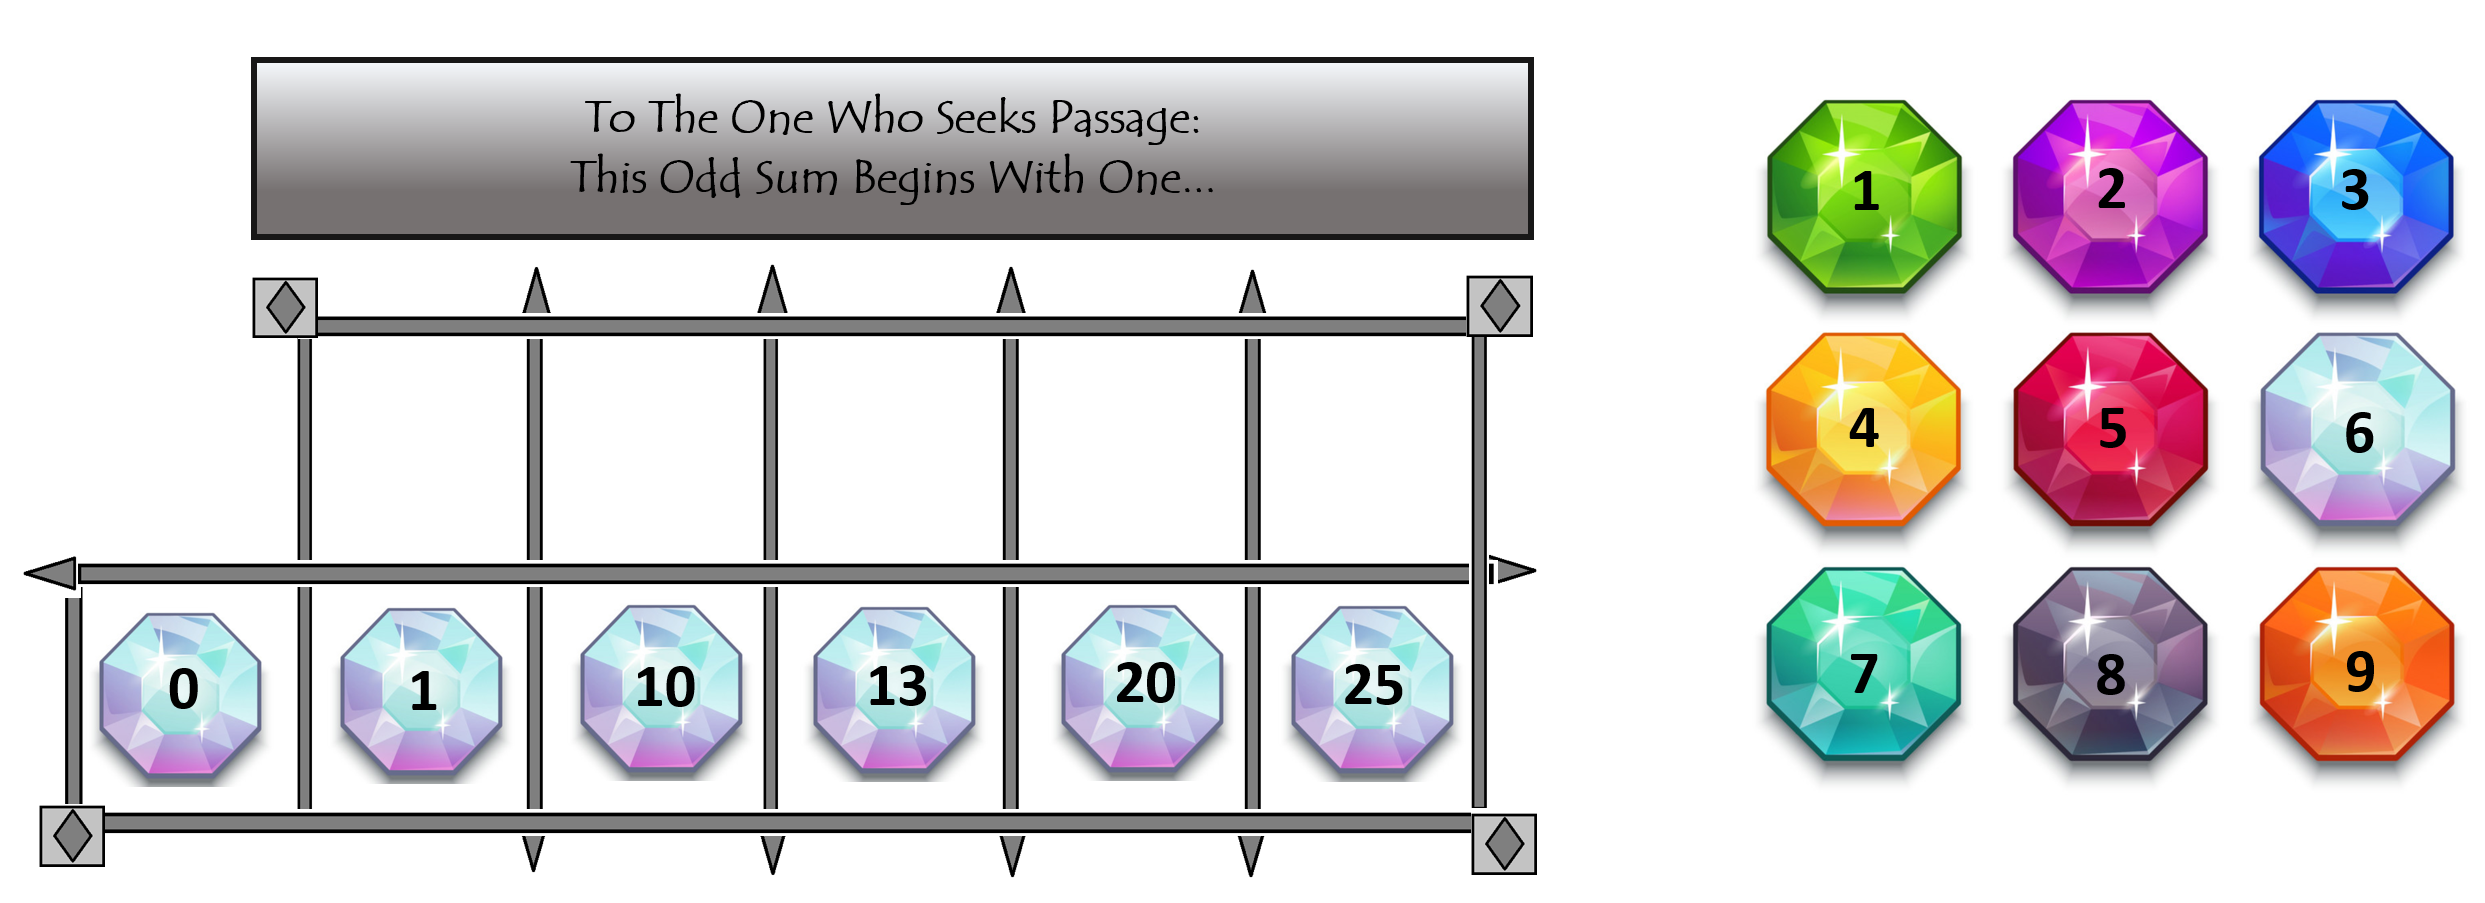
This Magic Gate is located at (9). It is a thin green light surface that spans across the tunnel, and the lock mechanism is hovering in the center. The Heroes must use gems given to them by the Royal Court of Magicians, and place them in the correct order. Any mistakes will result in an electric shock attack.
Click to open a higher resolution version in another window...


Adventure Two - The Red Dragon
From the Captain of the Guard to the Heroes:
Your group of Heroes have been selected to follow the Green Pass Road, first to Green Pass Overlook and then on to the Mountain Pass Fortress. You must purge all monsters from both fortresses.
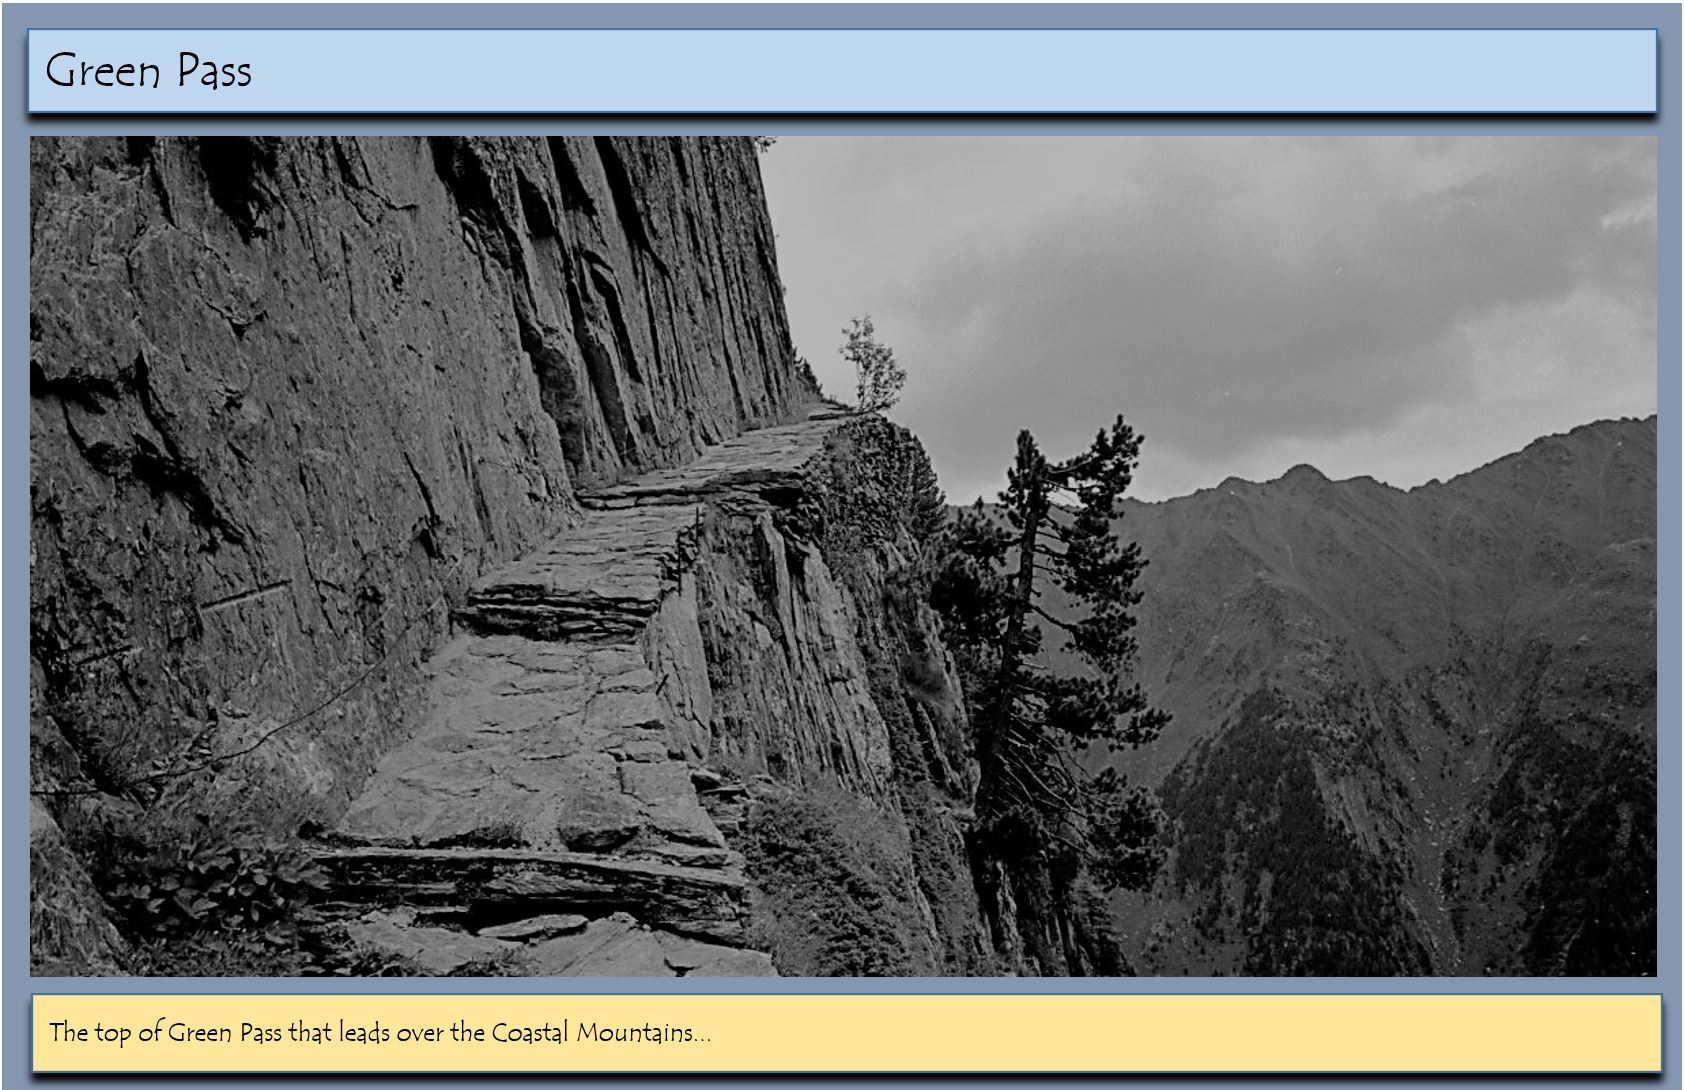
Green Pass Overlook is the oldest of the fortresses, the initial defense built to guard the town of Garrenfold during the first settlement period. It consists of a series of caves hollowed out to make a guard station and was originally occupied by Goblins. It is the most recent location to be over-run by monsters. Goblins who had disappeared deep beneath the Coastal Mountains during the first settlement have returned to take it back.
The Mountain Pass Fortress, built during the second settlement period, is the largest of the remote outposts. A combined force of Kobold and Yaun-ti warriors gained control soon after the Northern and Southern Fortresses were taken. Then a short time later, a Red Dragon arrived from over the mountains and now it dwells inside the fortress, coming out periodically to rain fire and terror down from the sky.
Armory Locations and Magic Gates:
Under orders from the Royal Family, for a number of years the Royal Court of Magicians have been forging and hiding magic items in every Garrison Armory across the kingdom, including the Fortresses at Kerrindale. Maps are provided to the Heroes that show the logical layout of each fortress with the location of each Armory, and a Bag of Gems are provided that can be used to unlock any Magic Gates that are in place to protect the Armories:
Click on each map to open a higher resolution:
Overview:
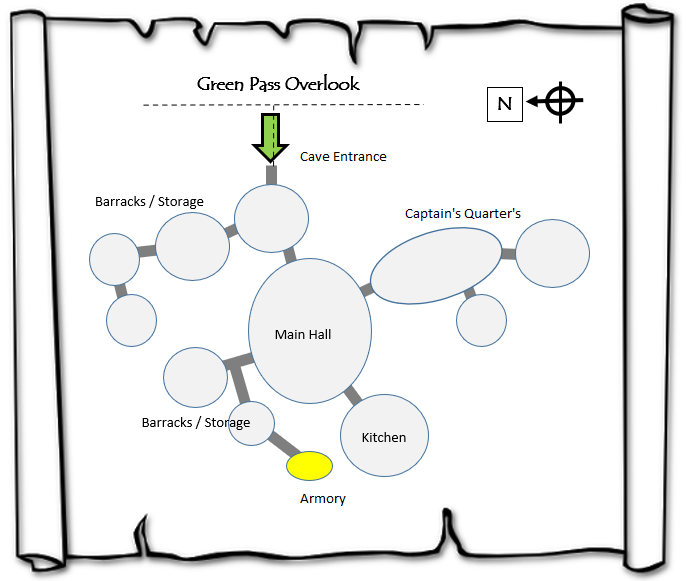
In Episode B1 (Green Pass Overlook), Heroes will encounter Goblins, Hobgoblin Archers and a Hobgoblin Captain in the upper caves. Then, down below are more Goblins and the Armory (with normal Weapons and Armor + some Magic Items), protected by a trap.
In Episode B2 (Green Pass Road), as the Heroes come down out of the pass they will encounter Warg Riders and a pack of Wolves. Later, as they approach the Mountain pass, they will encounter flying Giant Bat Riders and Archers who were sent after them.
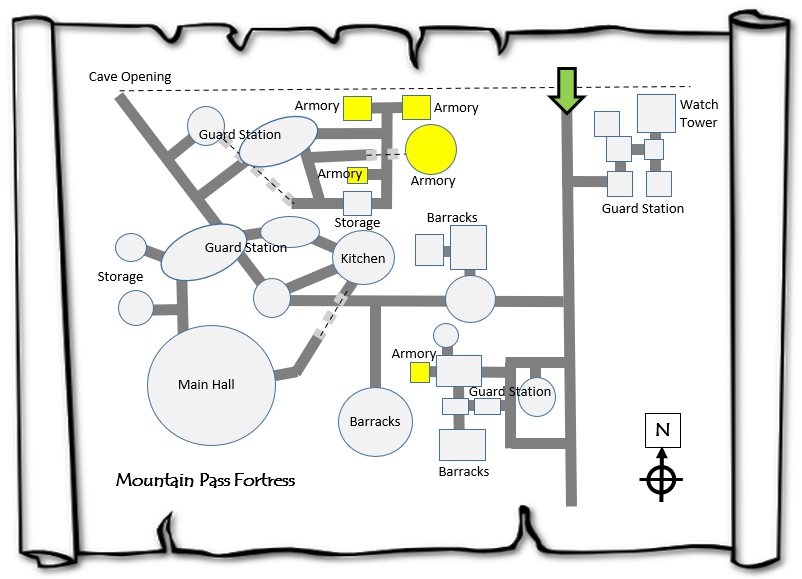
In the final Episode B3 (Mountain Pass Fortress), Heroes must check to determine if they have been seen by the watch tower, and will be ambushed immediately by Duergar Soldiers and Kobolds when they enter the narrow Pass Valley if they have. From there, they must work their way through the fortress, battling more Duergars and Kobolds, a Rat Swarm, a Duergar Captain + trained Mountain Lions, Yuan-Ti Commanders, Trolls, a Stone Golem and some Skeleton Warriors. There are multiple Armory locations, but most magic items have been consolidated to the Golem's room. The final battle is with a Young Adult Red Dragon, supported by it's Kobolds and Yuan-Ti.
Monsters:


Dungeon Maps:
Click on each fortress map to open a higher resolution version in another window...
1) Falling Rock Trap; 2) Goblins + Hobgoblin Archers; 3) Hobgoblin Archers; 4) Goblins; 5) Hobgoblin Captain; 6) Hobgoblin Archers; 7) Goblins; 8) Hobgoblin Archers; 9) Goblins; 10) Spiked Arm Trap; 11) Armory (no monsters).

B2-1) Warg Riders + pack of Wolves;
B2-2) Giant Bat Riders + Giant Bat Archers ;
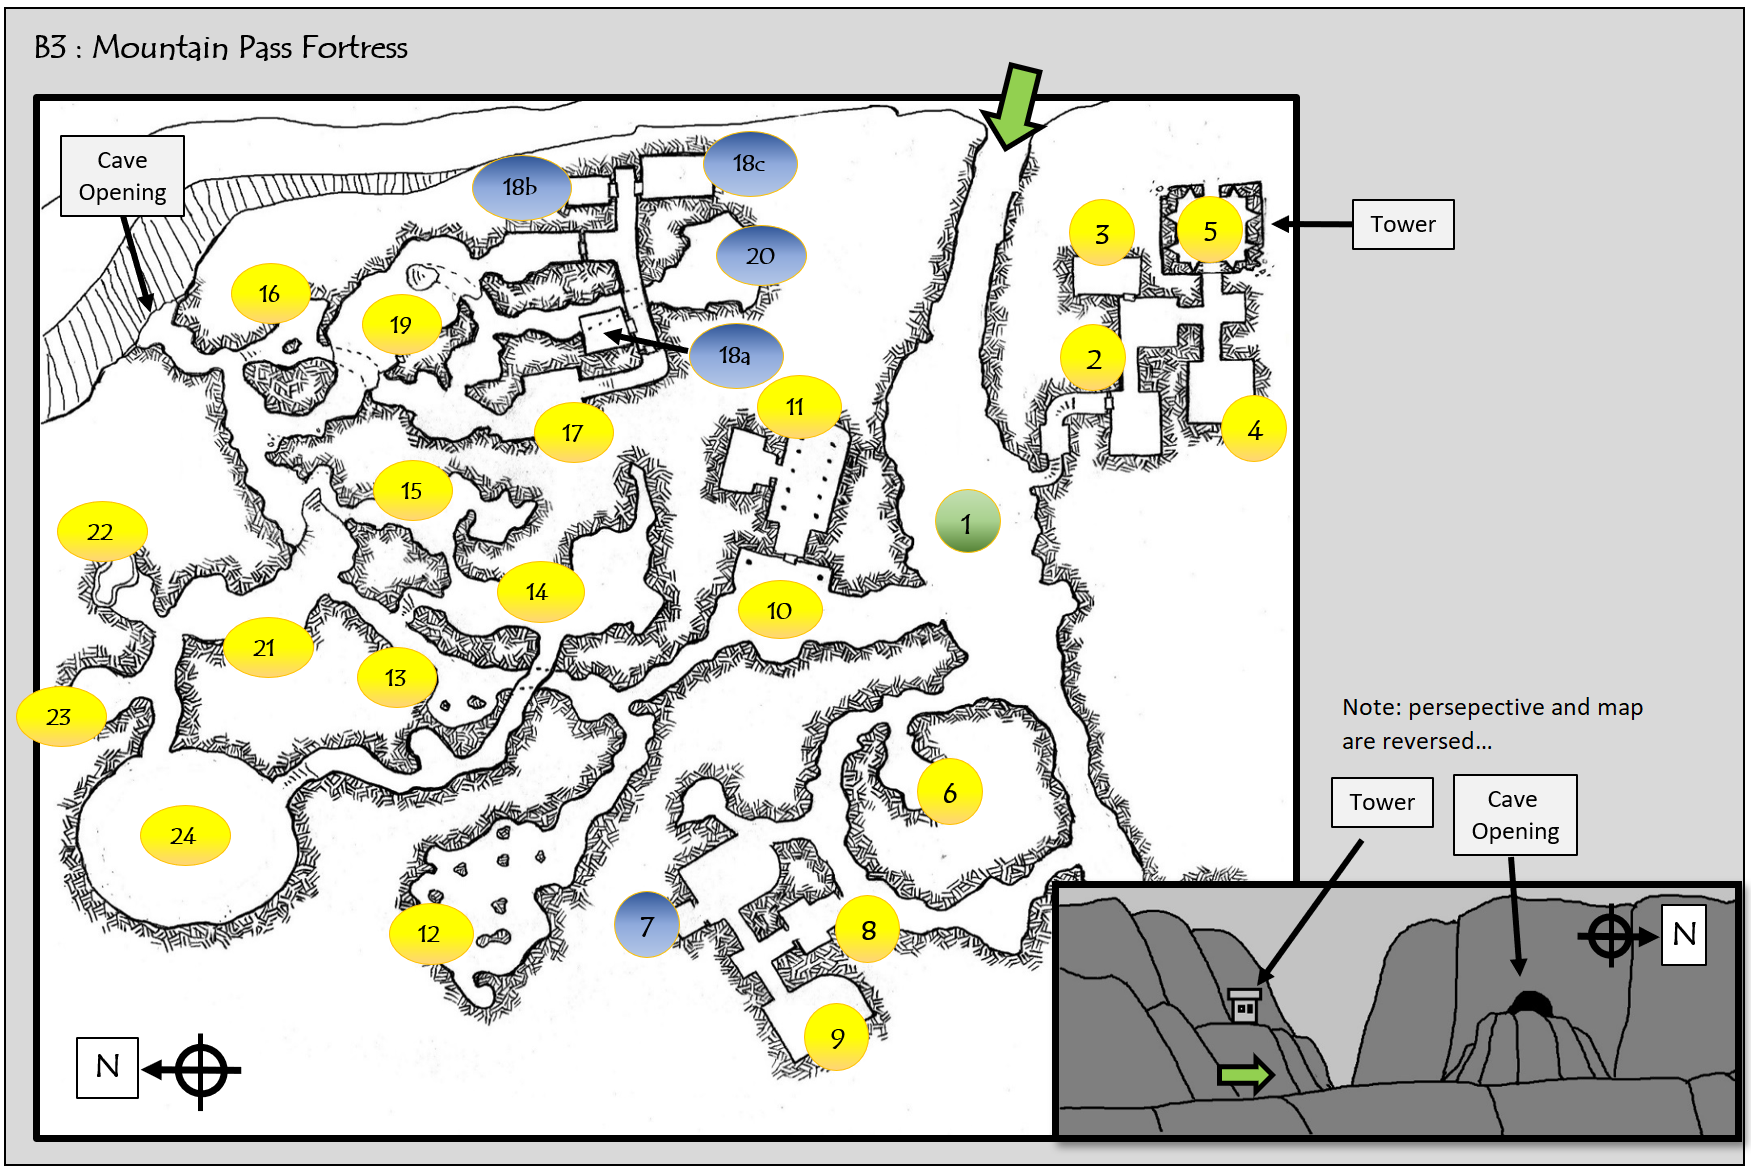
1) Empty or Duergar + Kobold ambush; 2-5) Duergar Guards or empty (because of the ambush); 6) Kobold Guards or empty (because of the ambush; 7) Armory with Kobold Guards; 8) Kobolds; 9) Kobolds + Yuan-Ti Captain; 10) trap or empty; 11) Duergar barracks + 1 Duergar Captain + trained Mountain Lions; 12) Kobold barracks; 13) trap or empty; 14) Trolls; 15) Kobolds + Yuan-Ti Captain; 16) trap or empty; 17) trap or empty; 18a-c) Armory; 19) Bat Swarm; 20) Main Armory + Stone Golem + Skeleton Warriors + Magic Gate; 21) Kobolds + Yuan-Ti Captain; 22) Bat Swarm; 23) Yuan-Ti Commander barracks; 24) Red Dragon.
Magic Gate:
This Magic Gate is located at (20). It is a thin green light surface that spans across the tunnel, and the lock mechanism is hovering in the center. The Heroes must use gems given to them by the Royal Court of Magicians, and place them in the correct order. Any mistakes will result in an electric shock attack.
Click to open a higher resolution version in another window...


Adventure Three - The Undead Mystery
From the Captain of the Guard to the Heroes:
Your group of Heroes have been selected to travel north along the coast and into the Dark Forest where the river meets the sea. There is a shorter road over Green Pass and through the Dark Swamp, but scouts report the presence of Giant Worms that are so large, they can swallow the whole party at once. So that road is no longer useful. Instead, you must make you way through the Dark Forest to Wizard’s Glade, and then onto the Northern Fortress. You must purge all monsters along the way.
Wizard’s Glade was created by the Royal Court of Magicians as a magic item cache for future need, in the event war broke out with the eastern kingdom of Da’rahad. While the forces of darkness cannot use the items, no doubt they can use a Find Magic spell to locate them and place a guard to try and prevent anyone else from using them.
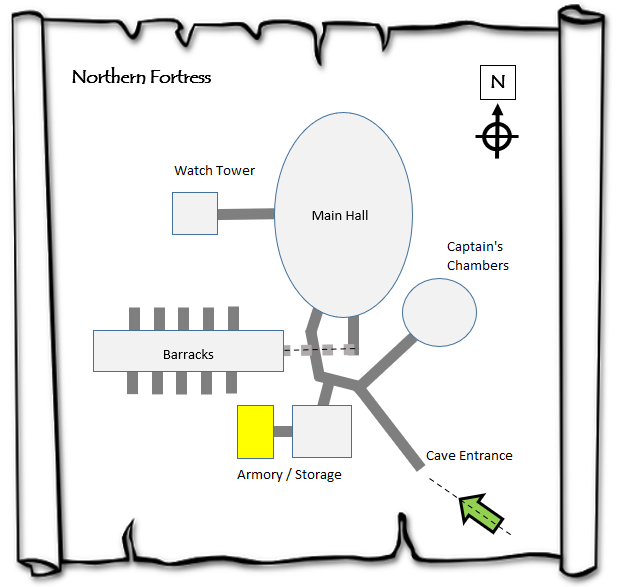
The Northern Fortress, built during the second settlement period, is covered in a dark mystery. It was the first to be attacked but no survivors escaped. And none of the scouts who have gone to investigate have returned either. The only information that is known comes from a dream that a monk from the Garrenfold Monastery had concerning a powerful undead presence there.
Armory Locations and Magic Gates:
Under orders from the Royal Family, for a number of years the Royal Court of Magicians have been forging and hiding magic items in every Garrison Armory across the kingdom, including the Fortresses at Kerrindale. Maps are provided to the Heroes that show the logical layout of each fortress with the location of each Armory, and a Bag of Gems are provided that can be used to unlock any Magic Gates that are in place to protect the Armories:
Click on each map to open a higher resolution:
Overview:
In Episode C1 (Wizard's Glade), Heroes will first encounter Brown Bears and Winter Wolves, all made aggressive by Dark Magic. Then, protecting the entrance to the hidden chambers is a trap and a Magic Lock. Inside, the chambers have Giant Snakes, Skeleton Soldiers and the Armory (with Magic Items) guarded by a Stone Golem.
In Episode C2 (Northern Road), Heroes will encounter a pack of Winter Wolves on the road. Then, as they approach the Northern Fortress, they will fight their first wandering Undead Monsters, including Zombies and a Ghoul.
In the final Episode C3 (Northern Fortress), Heroes must face a chamber full of Ghouls and Zombies (and an Undead Curse Magical Trap). The Armory (with Magic Items) is being guarded by a Flesh Golem and supporting Skeletons. The main chamber houses a powerful Lich (who is the Undead Mystery - the one who led the attack on the fortress) protected by Skeleton Soldiers and Archers, and two Wereboars. From there is the Watch Tower with Gargoyles and a long hallway with barracks that hold dead Royal Guards that have all been converted into Zombies.
Monsters:


Dungeon Maps:
Click on each fortress map to open a higher resolution version in another window...

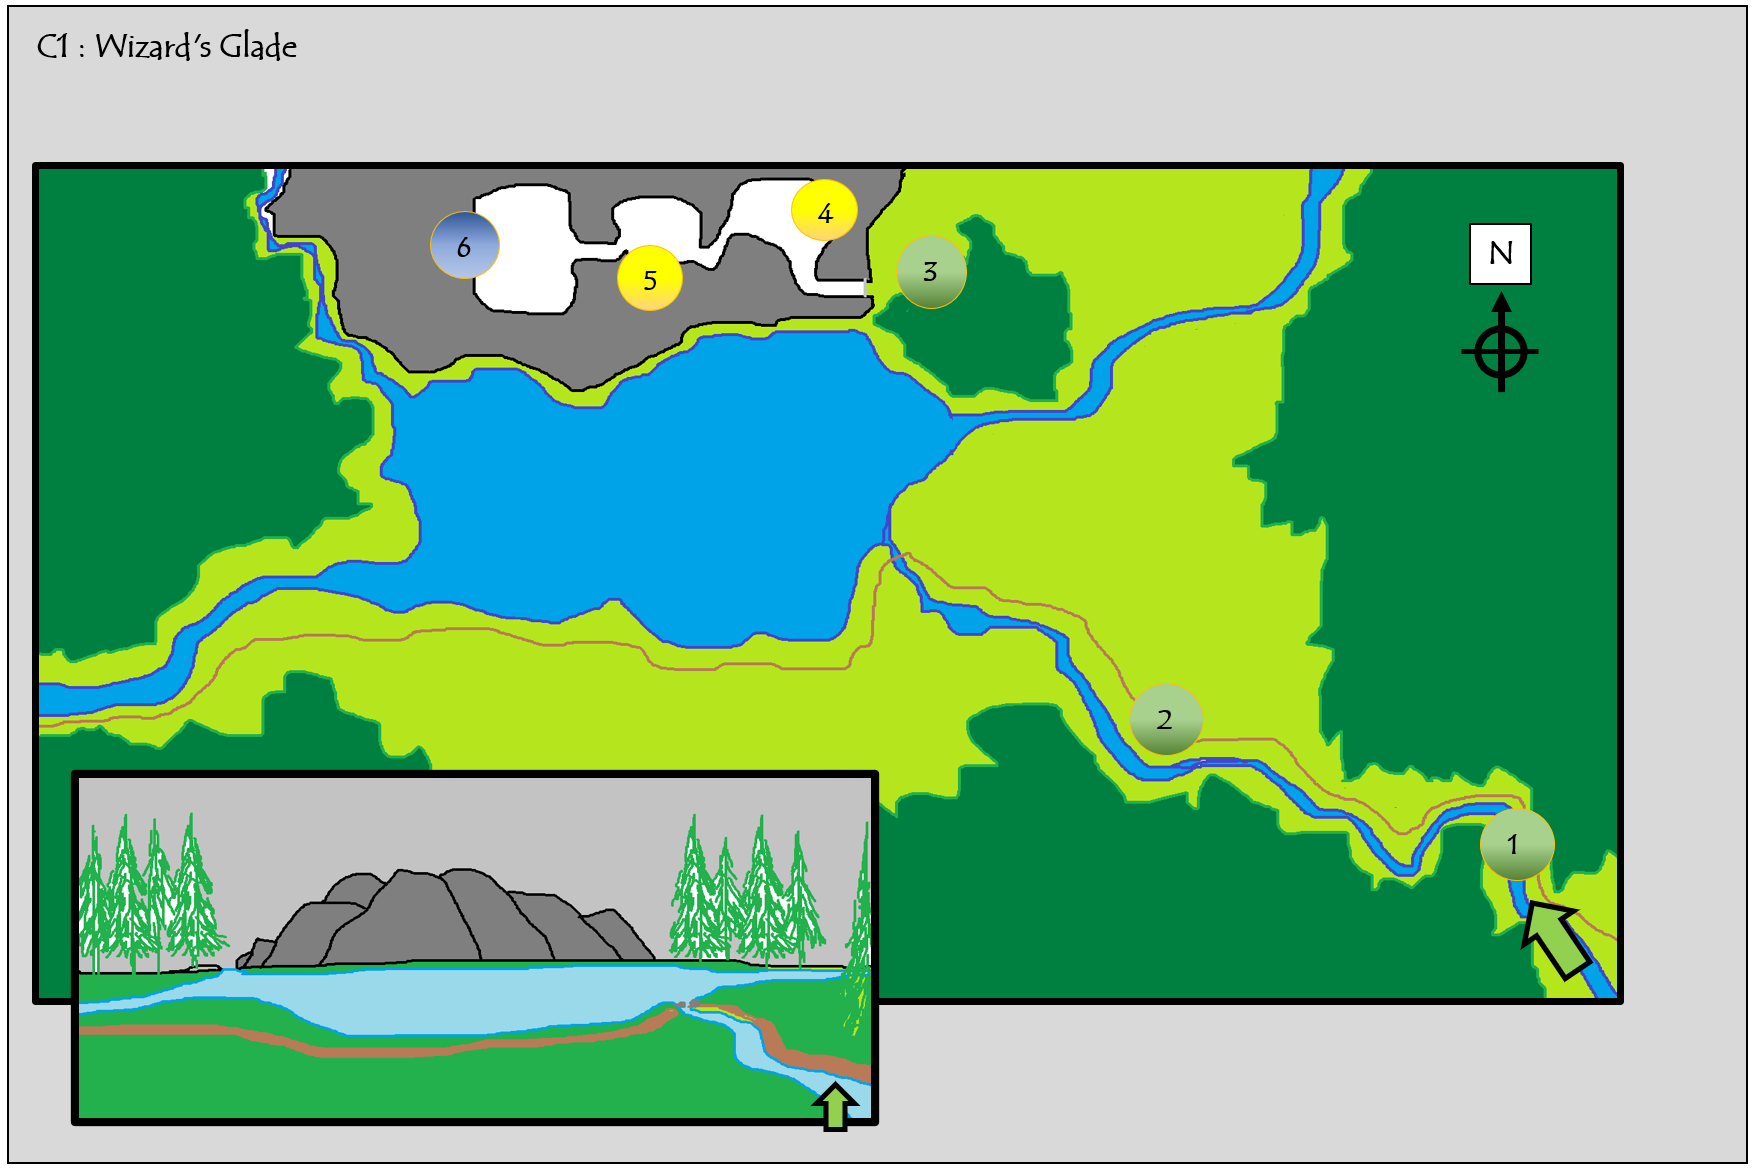
1) Brown Bears; 2) Winter Wolves; 3) Secret Magic Entrance guarded by trap and magic lock; 4) Giant Snakes; 5) Skeleton Soldiers; E) Armory with Magic Items guarded by a Stone Golem;

C2-1) Large pack of Winter Wolves;
C2-2) Wandering Zombies + Ghoul;

1) Undead Curse Magic Trap; 2) Chamber with Ghouls and Zombies; 3) Flesh Golem and Skeleton Soldiers; 4) Armory locked with a Magic Gate; 5) Main Chamber with Lich + Skeleton Soldiers + Skeleton Archers + Wereboar Captains = Lich is the Undead Mystery = the one who led the original attack against this fortress; 6) Watch Tower with Gargoyles; 7) trap or empty; 8) Barracks filled with dead Royal Guards who have been converted into Zombies;
Magic Gate:
This Magic Gate is located at (4). It is a thin green light surface that spans across the tunnel, and the lock mechanism is hovering in the center. The Heroes must use gems given to them by the Royal Court of Magicians, and place them in the correct order. Any mistakes will result in an electric shock attack.
Click to open a higher resolution version in another window...

Adventure Four - The Monster Siege
From the Captain of the Guard to the Heroes:
Your group of Heroes has been selected to stay behind and protect the town of Garrenfold from the Red Dragon trying to make air raids, and from any Monster Soldiers that happen to make it to the town Gates.
After the other Heroes start their journeys, a head-count of the remaining people in town who can help defend is carried out. In addition to the three Heroes, there are 75 Royal Guards (25 assigned to each Hero), 45 Archers (15 assigned to each Hero), 30 Townsfolk Militia (10 assigned to each Hero), a Magician, an Archer Captain and the Senior Captain of the Garrison.
Watchmen have been placed at every tower on the fortified wall of the town and of the Garrison, and each has a horn to sound the alarm if enemy forces are spotted. If a horn is blown, the Heroes and the Magician are instructed to converge there and provide defense.
On the second night after the other Heroes left:
Before the midnight hour, a Seer at the Garrison reports some disturbing news to the Captain: Apparently, the Monster forces who have occupied the Fortresses along the Western Wall are not the only forces on the move. The Seer has witnessed in her dream two separate forces of raiding war ships that have left the western side of Kerrindale, one sailing around the north coast and the other along the south. They should converge on the town sometime tomorrow, under the cover of fog.
After this report has been shared with the Heroes, one of the Brothers from the Monastery arrives with more news - while he was in prayer, it was revealed to him through Omen that the first attack will arrive at the docks with a special task force of Orcs who will try to fight their way to one of the Gates and unlock it for other Monster forces to enter the town.
With little time to spare, the Captain places his forces on high alert and directs the Heroes to the Docks to support the Royal Guard and Town Militia already in place there. Then he warns the watchmen at each of the Gates of the coming threat.
Together, you must hold the town until more Royal Guard reinforcements arrive by sea from the Mainland!
Overview:
In Episode 1 (Uninvited Guests), Heroes and NPC must defend the town as 5 ships land at the docks (E1). The first four have Orc Fighters and Archers, the last has an Orc Captain with Fighters and Archers.
In Episode 2 (The Garrison Fire), Heroes and NPC must defend the Garrison itself (B), standing on the walls and towers, either from the Red Dragon (if it was not defeated during Adventure Two by the Heroes), or from waves of Giant Bat Riders, Giant Bat Archers and a Drow Commander who rides a Giant Vulture and is armed with a magic staff that produces fireballs. These enemies are trying to swoop down and set the Garrison itself on fire, and if enough HP Damage is taken by the building (as an Object) then a raging fire will start and cause the death of many NPC. The Red Dragon will retreat if it takes 1/2 HP damage, the other Monsters must all be defeated.
In the final Episode 3 (The Final Stand), Heroes and NPC must defend the Southern Road Gate (A3) from three waves of Monster attacks. The first wave involves an Ogre, Orc Ladder Teams, and supporting Giant Bat Riders and Archers, (the Ladder Teams will try to make it up onto the wall while the Ogre tries to beat down the Gate). The second wave involves a Drow Commander, an Orc Battering Ram Team, more Ladder Teams and supporting Giant Bat Riders, (The Commander and Ladder Teams will try to make it up onto the wall while the Battering Ram Team tries to beat down the Gate). The third wave involves a Drow Wizard, a team of Warg Riders and a large pack of Wolves, (if the Gate is still not broken through, the Wizard has a Lightning Bolt to try and finish it - if the Gate still survives, then the Wizard, Wargs and Wolves will retreat).
Monsters:


NPC:


Dungeon Maps:
Click on map to open a higher resolution version in another window...

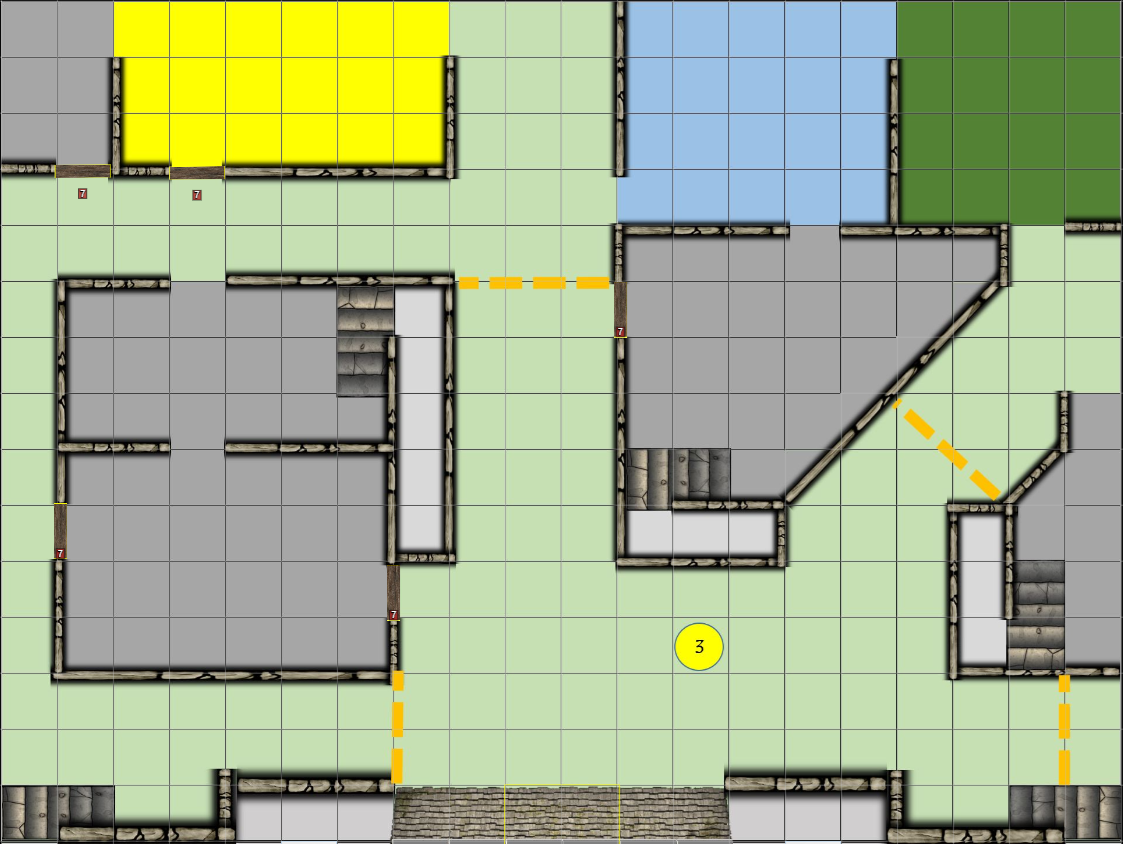
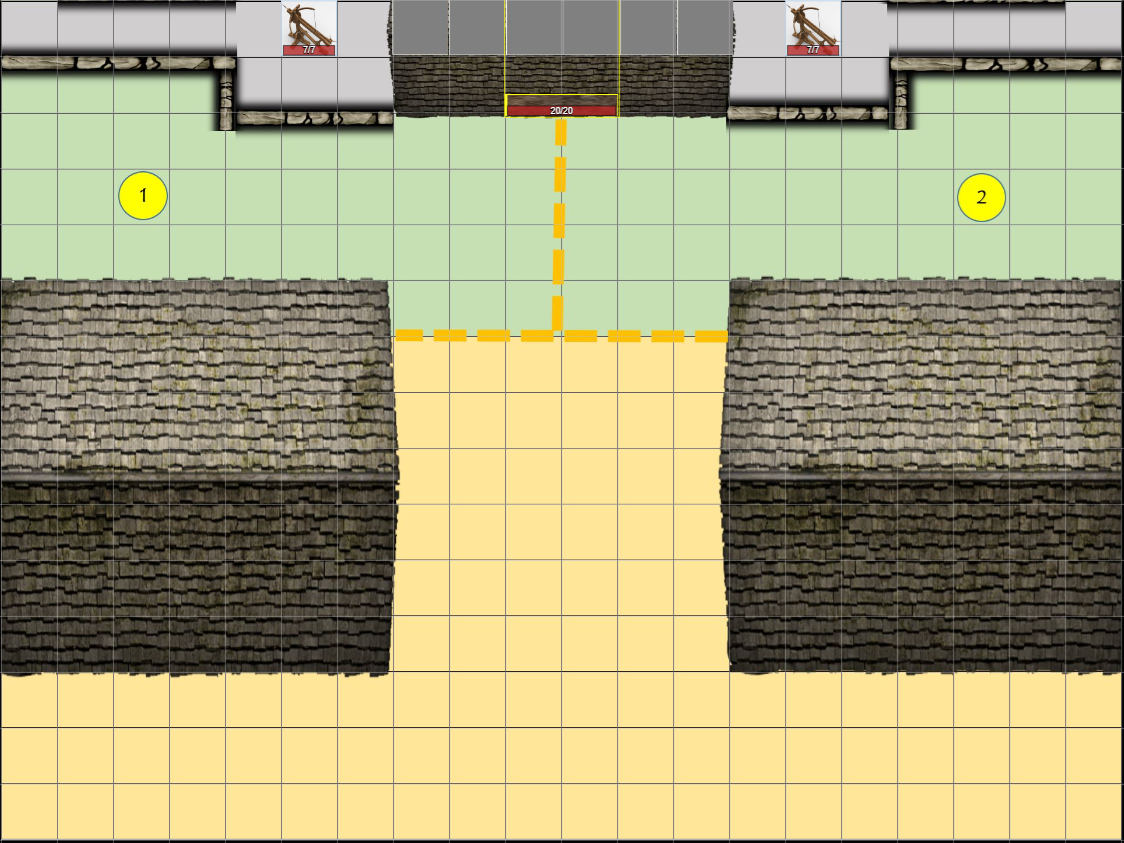
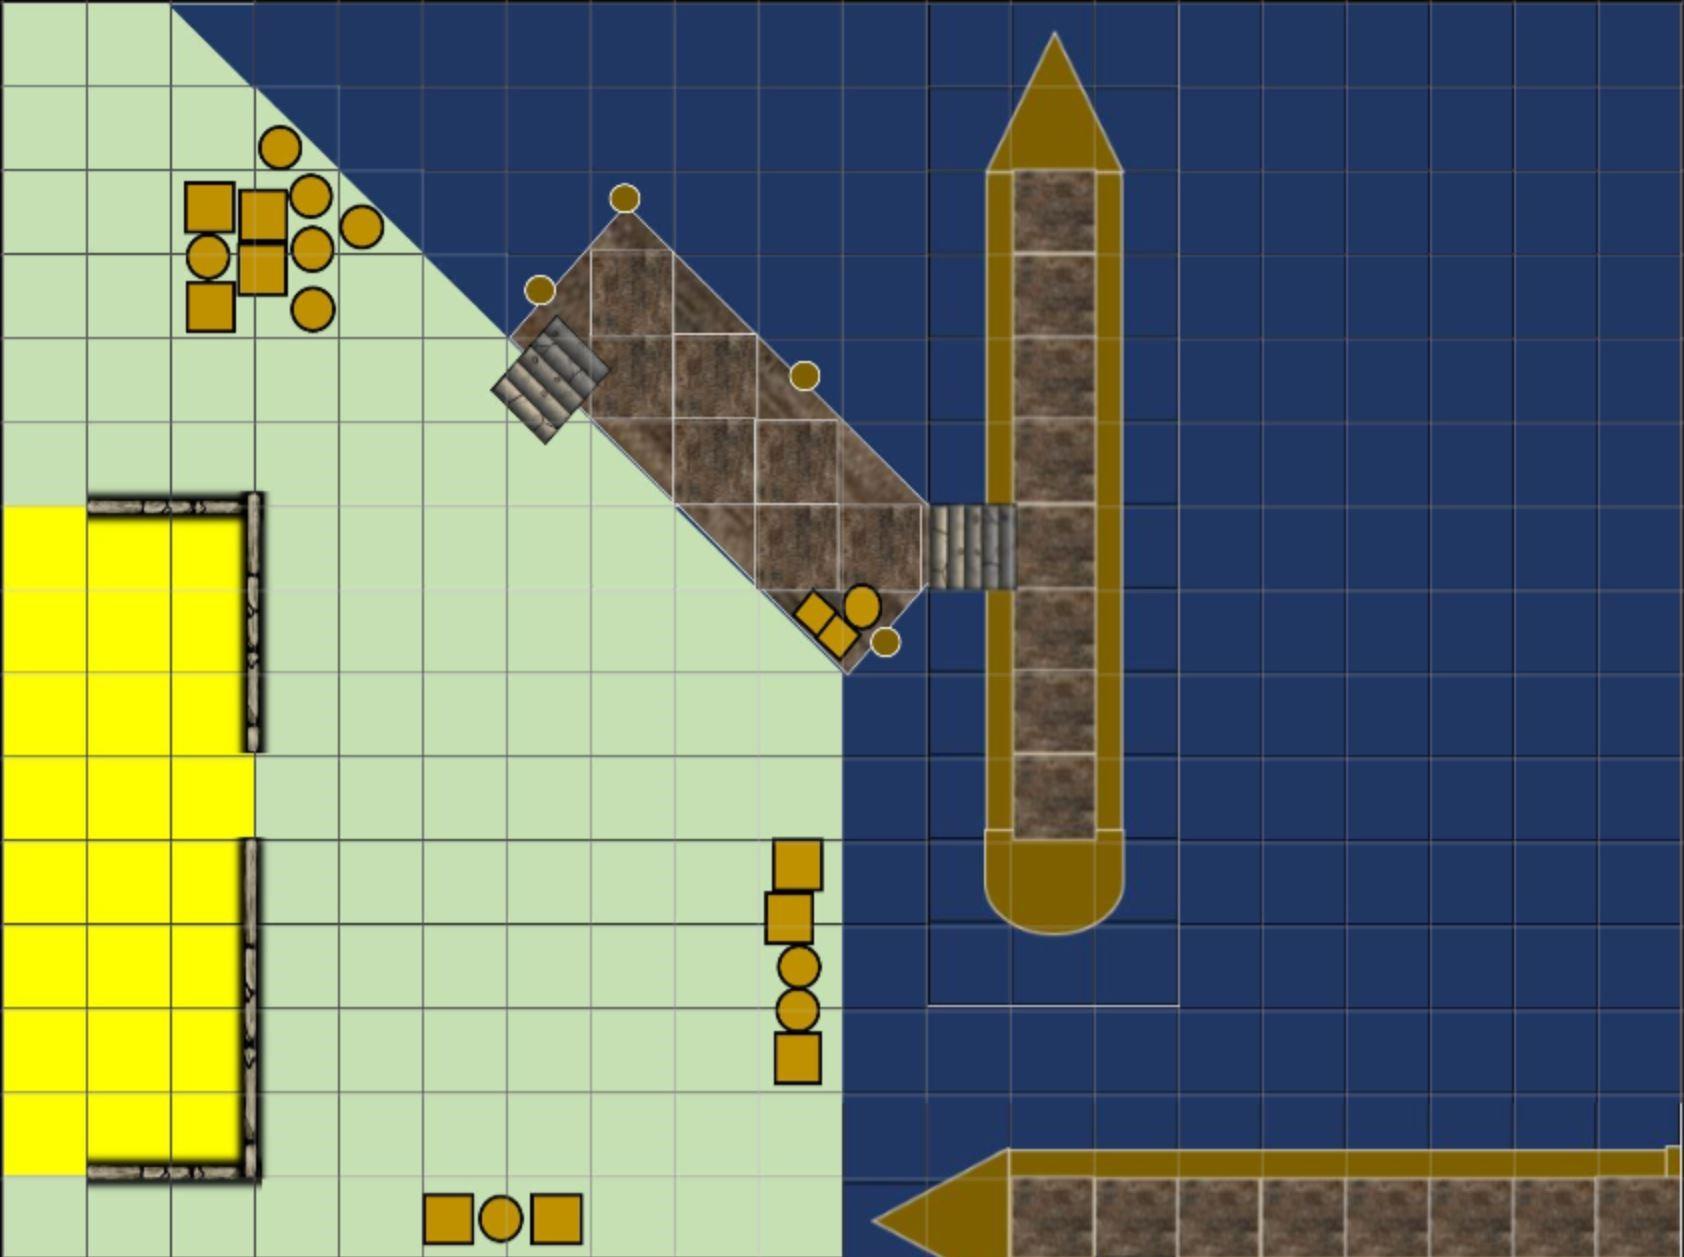
E1) Docks where Episode 1 happens; B) Garrison where Episode 2 happens; A3) Southern Gate where Episode 3 happens.
Garrenfold Docks:
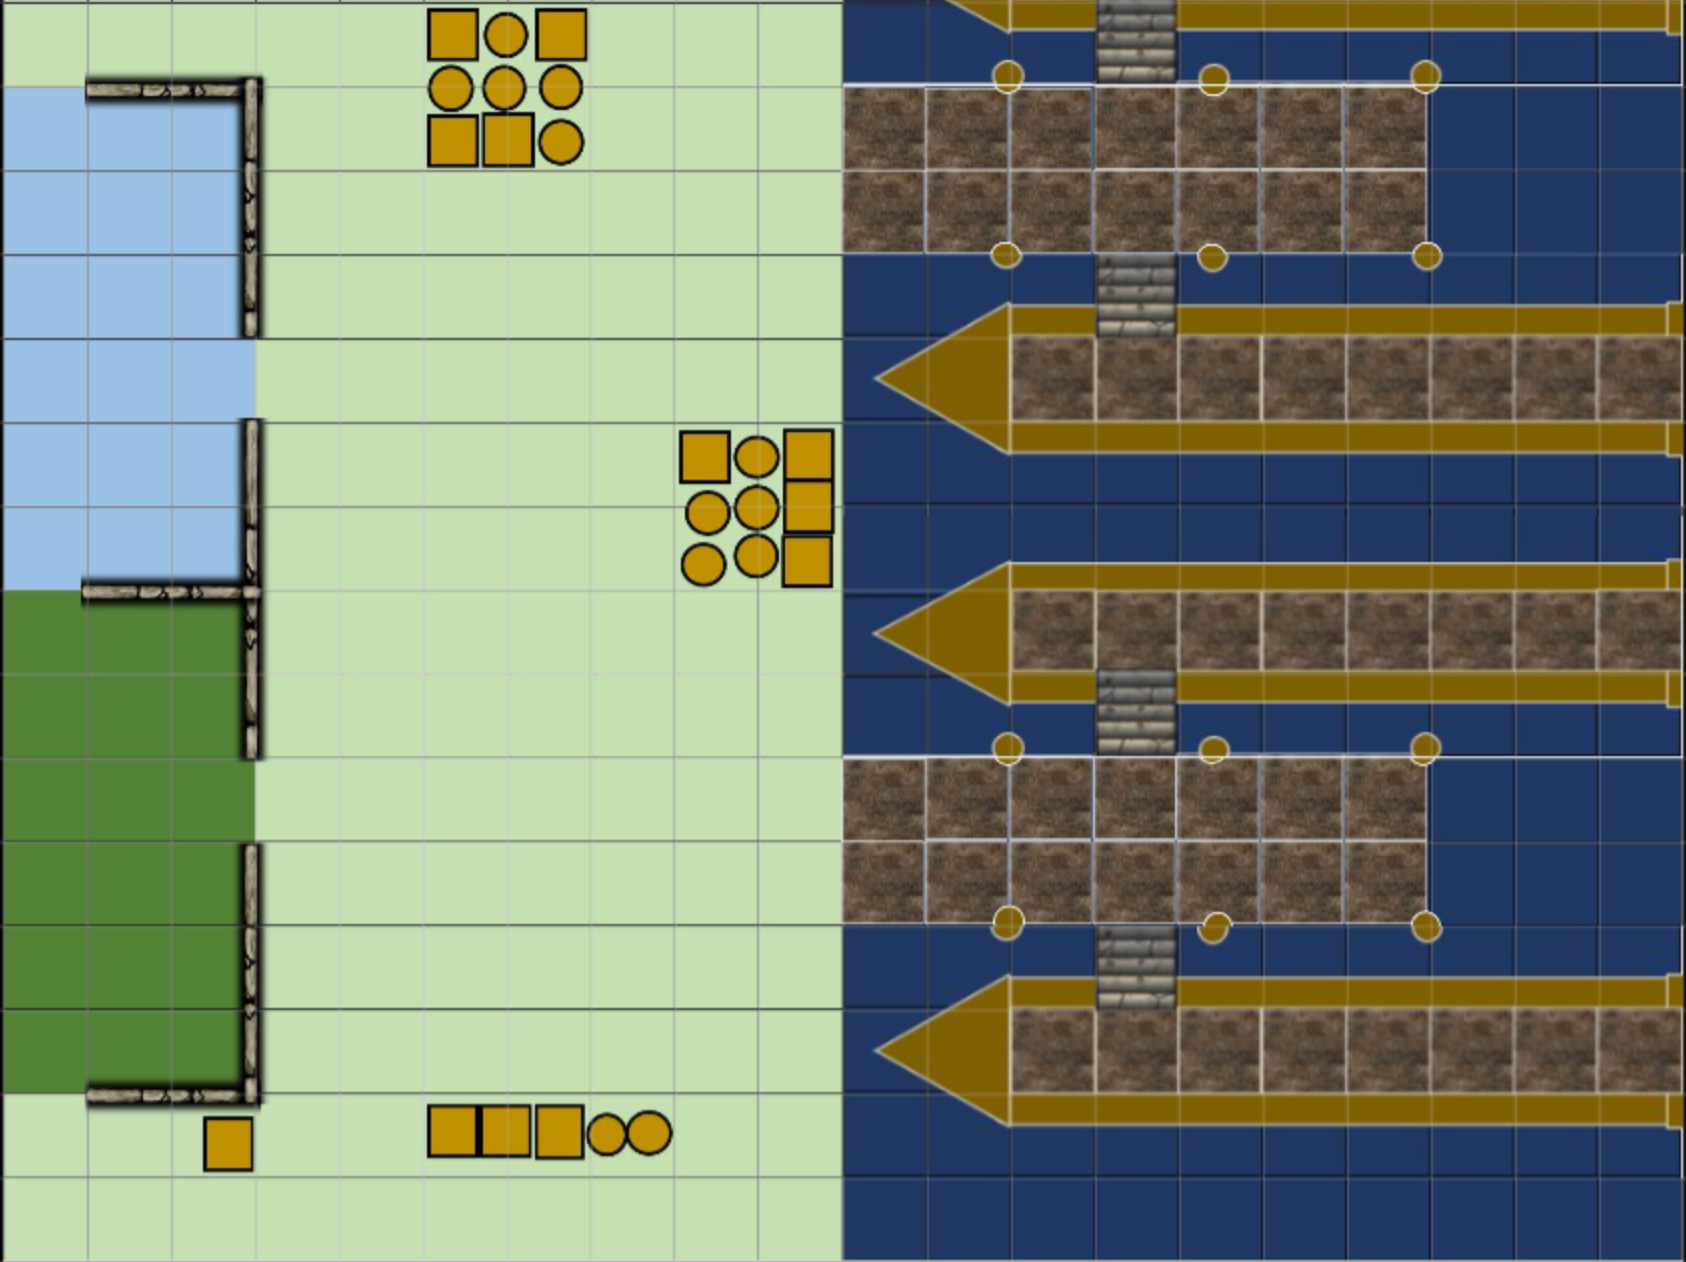
Garrison Wall:
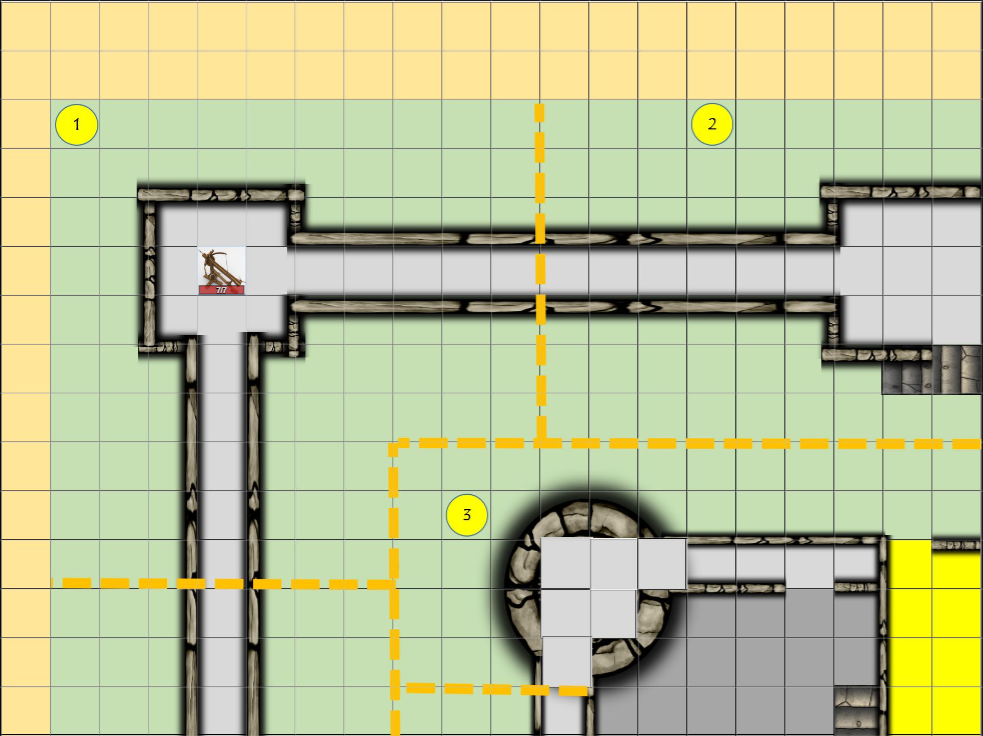
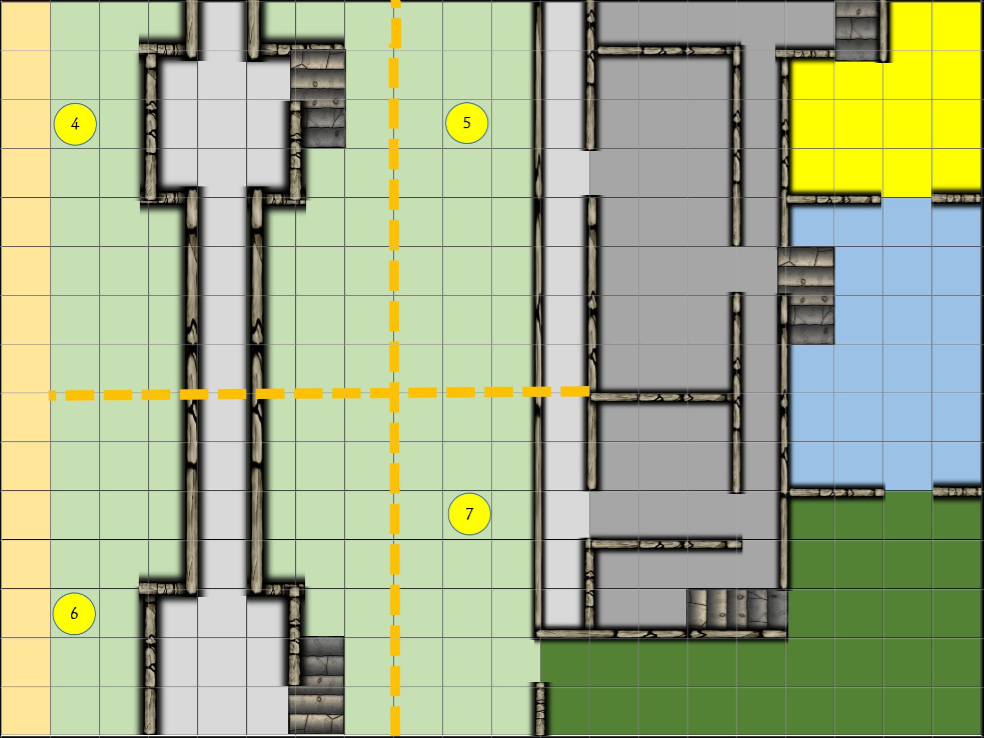
Garrenfold Gate: